Water Pressure Reducing Valve Installation

How To Install A Pressure Reducing Valve And Adjust Water Pressure Installation Plumbing Home Repair

Z Tide Group Ztidevalve Twitter Our Stainlesssteel Direct Acting Pressure Reducing Regulator Valves May Installed In Vertic Installation Tide Hydrant

Z Tide Group Ztidevalve Twitter Pressure Reducing Valve Installed Under Outdoor Environment Pr Fire Protection System Fire Protection Installation

Pressure Reducing Valves In Water Work Application Philippines Pressure Control Valve Control Valves Valve

Water Pressure Reducing Valve Valve Pressure Plumbing Valves

Water Tank Installation Water Storage Tanks Water Storage Domestic Water Pumps

Mount the fitting upon the water pressure reducing valve and then fit this into position.
Water pressure reducing valve installation. Hoses are a common location. Unions at the valve. Shut off the water to the house then drain water from the plumbing system. Using threaded pipe and fittings attach a pressure gauge to each side of the pressure reducing valve.
There are two types of water pressure reducing valves direct acting and pilot operated which use globe or angle style bodies. So the home inspector will always recommend getting the valve installed in any home new or old with a psi of 80 or higher. It is best to check this before you have soldered up your pipes. So any new home will have one of these valves installed.
If you install your valve the wrong way around the flux will not serve to block the water and the pressure will not be reduced. Take the water pressure reducing valve and attach it to the fittings. If you install a pressure reducing valve before the hose bib branches you will lose your wonderful high pressure. The flux needs to be forced down by the pressure of the water so the valve blocks the flow.
Warm up all of these fittings with the soldering torch and then apply some suitable caulking paste to the edges of the fittings. The city code for new home construction states the psi cannot be higher than 80. If the pressure is excessively high install a pressure reducing valve. Take the time necessary to install the extra piping on the high pressure side of your water service line to allow you to keep high pressure at certain fixtures.
Hold the valve assembly against a water pipe and mark where to cut the pipe. Use a tubing cutter to remove a section of water pipe as indicated by the marks made in step 4. Turn off all the water. For the home inspector this is an issue of liability.

Booster Pump Explain New 2017 Youtube Water Pressure Pump Refrigeration And Air Conditioning Plumbing Tank

Wood Stove Hot Water Google Search Hot Water Home Maintenance Distillation

Pin En Green Business Tips

Piston Design Pilot Operate Pressure Reducing Valve In Fire Protection Pressure Control Valve Fire Protection Sprinkler System

Solenoid Valve On Water Supply Application Which Installed Vertically Compact Design Feature Allows Installer Pressure Control Valve Water Supply Installation

Pressure Reducing Valve Set Model Rs 201 H Built With Strainer And Bypass Line Providing Easy Maintenance And Sav Pressure Control Valve Control Valves Valve
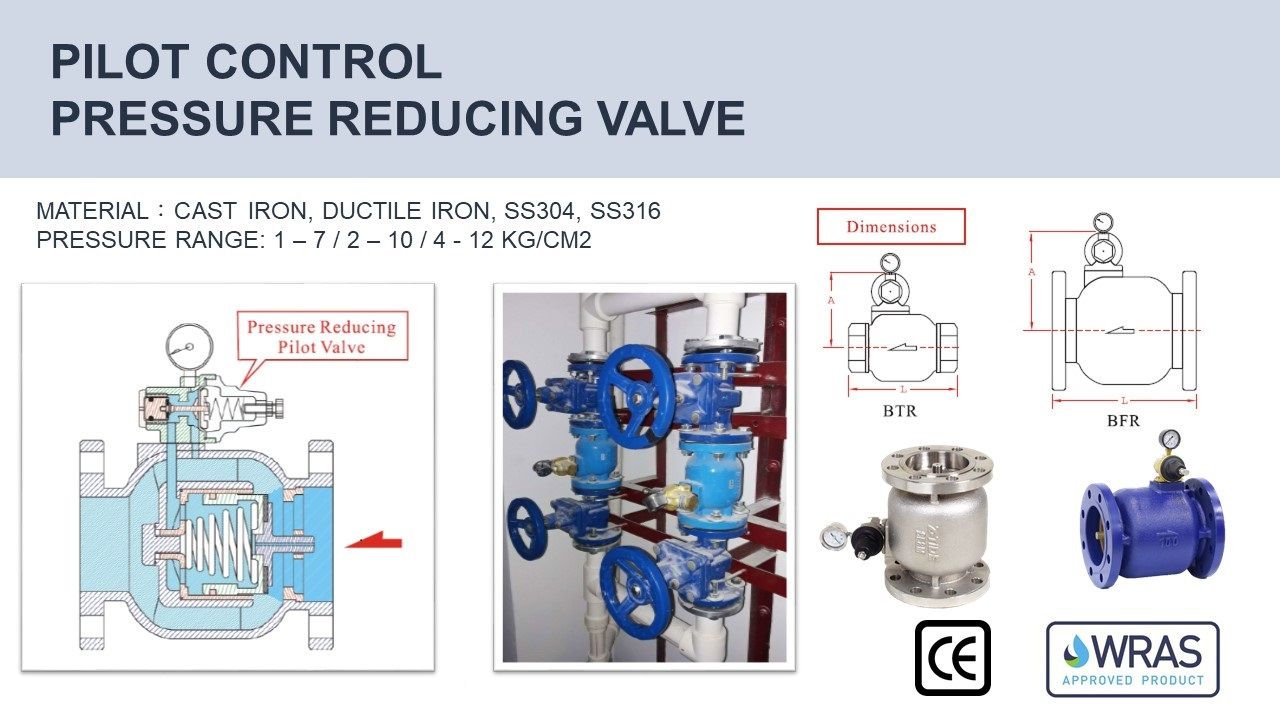
Pilot Control Pressure Reducing Valve Pressure Control Valve Control Valves Valve

Water Pressure Reducing Valves Water Conservation Learn About Watts Canada Water Conservation Valve Water Pipes

Pressure Regulators Pressure Control Valve Control Valves Valve

Low Water Pressure In Your House The Problem May Be The Pressure Reducing Valve In Your Yard We Dug This O Plumbing Pressure Control Valve Low Water Pressure

The Main Role Of The Pressure Reducing Valve Engineering Hydraulic Systems Mechanical Engineering

1 5 Inch Pressure Reducing Regulator Valve On Hydrant Pipeline Bangladesh Pressure Control Valve Control Valves Valve

Z Tide Group Ztidevalve Twitter Pressure Reducing Valve Built On A Mining Pressure Reducing Station Pressu Pressure Control Valve Control Valves Valve

Z Tide Group Ztidevalve Twitter Piston Design No Outer Conduit Pressure Reducing Valve Regulator Ins Pressure Control Valve Fire Protection Valve

Hi The Water Pressure In My Home Is Low And I Have Started Searching For A Decent Water Booster System Water Pressure Pump Water Filter Diy Shallow Well Pump

Electric Boiler For Forced Hot Water Heat System Google Search

Ss304 Water Hammer Arrester In Industrial Application Bangladesh Pressure Control Valve Control Valves Industrial

Float Valve Groove Type Stainless Steel Pressure Control Valve Control Valves Valve
Https Encrypted Tbn0 Gstatic Com Images Q Tbn 3aand9gctcevi0vbfl6 Iyivez3ymaatan35ejne3ytyuparhffwjhrbkj Usqp Cau

Valvula A Solenoide Pressure Control Valve Control Valves Valve
How To Inspect And Fix Your Own Gas Fired Boiler Gas Boiler Water Boiler Water Heating Systems

Valvula Flotador Flutacao Pressure Control Valve Control Valves Valve

Pump Control Valve Prevent Water Hammer Effect Equivalence To Combination Of Pump S Variable Drive Check Valve Pressure Control Valve Control Valves Valve

Brass Dn20 3 4 Water Pressure Regulator Valve And Pressure Gauge Pressure Retaining Valve Water Pressure Reducing Valve Pressure Gauge Valve Gauges

Reliable Brass Water Pressure Regulator With Gauge Flow Dn20 3 4 Connector Adjustable Mayitr Pressure Reducing Valves Affiliate

Ss304 Silent Check Valve With Hang Type Plug This Full Flow Lift Type Design Allow Water To Flow Directly Through The Valve Without Resista Valve Axial Plugs

Reguktor Davleniya Posle Sebya Pryamogo Dejstviya Belgiya Pressure Control Valve Control Valves Valve

Prv Pressure Reducing Valve Pressure Reduction Valve Pressure Regulating Valve Water Heater Parts Relief Valve Valve

Direct Acting Pressure Reducing Valve In Thread Stainless Steel Available In Wras Acs Atex Certifications Pressure Control Valve Control Valves Valve

Pressure Regulator In Titanium Material Suitable For Oil Gas Offshore Platform And Corrosive Mediums Visit Pressure Control Valve Control Valves Pressure

Thick All Copper Water Supply Water Pipes Pressure Reducing Valve Hot Water Purifier Household With Gauge Dn15 20 25 32 Water Pipes Water Purifier Water Supply

Apollo 3 4 In X 3 4 In Lead Free Bronze Fnpt Pressure Reducing Valve With Gauge 69elf114twg Bronze Things To Sell Ebay

Amortiguador Angulas Golpe Ariete Pressure Control Valve Control Valves Valve

Atex Conform Pressure Regulator Reducing Valve That Applicable To Explosive Environment Such As Oil Gas Indust Pressure Control Valve Control Valves Valve

Steam Boiler Manufacturers Germany Click Visit And Get More Ideas In 2020 Steam Boiler Boiler Efficiency Boiler Installation

38 71 Buy Here Https Alitems Com G 1e8d114494ebda23ff8b16525dc3e8 I 5 Ulp Https 3a 2f 2fwww Aliexpress Com 2fitem 2f3 4 Pressure Gauge Hardware Plumbing

Come Visit Us To View Our Unique Ul Listed Piston Design Pressure Reducing Valve In Valveworldam Hall E Stand 1 Pressure Control Valve Valve Control Valves

Water Hammer Arrester In Stainless Steel Material Effectively Reduce Exceed Pressure Within Pip Pressure Control Valve Stainless Steel Material Control Valves

Pin On Valves

Foot Valve For Fire Protection Water Tank In 2020 Water Tank Pressure Control Valve Fire Protection


Improving Water Pressure Water Pressure Pump Pressure Tanks Well Pump Repair

